
Dog breed
Golden retriever embroidery pattern: stitch your own golden from a photo
To embroider a golden retriever, back stitch the outline of the head, drop ears and chest, then satin stitch the eyes and nose. Finish with a few long, curved fur lines on the ears and chest. Use 2 strands of black floss on oatmeal linen in a 6-inch hoop, and suggest the feathering instead of stitching every strand.
- Coat Long and feathered, gold to cream
- Ears Drop ears with feathering
- Look for Feathered ears and chest, kind eyes
- Line-art fit good
The real pattern: Maple, our sample golden
This is what our pattern maker made from a photo of Maple, one of the sample dogs we use to test it. The drawing, the dot pattern and the stitched preview are its real output, not a mock-up.
 1 The photoA sample photo (AI-made)
 2 The drawingClean line art, made by the pattern maker
- 3 The patternA dot at every needle hole, about 1/8 inch apart
- 4 StitchedA preview drawn from the pattern, in a 6-inch hoop
- Back stitches
- 681
- Satin fills
- 6 (eyes and nose)
- Design size
- 3.8 × 4.7 in
- Thread
- 2 strands of black
- Rough stitching time
- 3½–5½ hours
Look at the ears first. The pattern doesn't trace every hair. It gives each ear a clean outline and a handful of longer curved lines that follow the feathering. That's the whole trick with a golden.
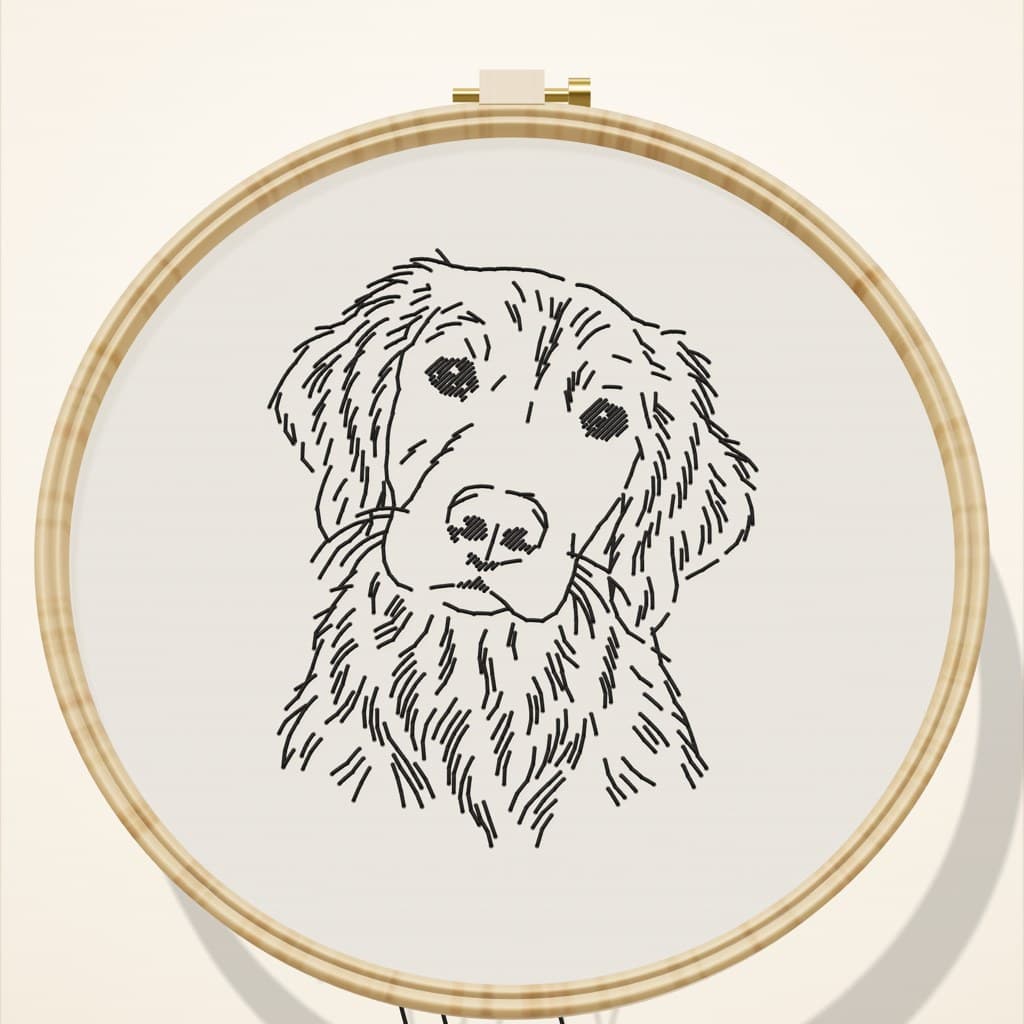
What makes a golden look like a golden in thread
A golden retriever has a long, feathered coat that runs from gold to cream, soft drop ears with feathering, and a kind look around the eyes. Black thread on linen can't show the color. It shows the shape, and the direction the coat grows.
- The ears carry the breed. Back stitch the outline of each drop ear, then add three to five long, curved strokes that follow the feathering down and out. Leave the rest of the ear bare.
- The chest is a few lines, not a fill. Stitch the longest fur lines on the chest from the root toward the tip, the same way you'd stroke your dog.
- The eyes make it kind. Satin stitch the pupils from the middle out and leave the small highlight bare. A soft, clear eye is what separates a golden from any other dog.
- The muzzle stays simple. The edge of the nose, a satin-filled nose and two short mouth lines are enough.
A light coat is easy for the pattern maker, but long feathering can add stray little lines. If your pattern looks busy, stitch the Simple version. It keeps the outline, the face and only the longest fur lines.
Getting a good photo of your golden
- Shoot near a window in soft daylight. Bright sun on a gold coat washes out the edges of the ears.
- Get both eyes sharp. A golden's dark eyes stand out against a light face, so they come through well when they're in focus.
- Smooth the ears first if you can. Wet or tangled feathering turns into a lot of extra lines.
- Fill most of the photo with the head and chest, and keep it to one dog.
More on what works and what doesn't in how to choose a photo for a pet portrait.
Stitching order for a golden retriever
- Outline first. Back stitch the outline of the head, the ears and the chest, dot to dot. Start at the top of the head and work down one side.
- Face lines. Stitch the lines around the eyes, the edge of the nose and the mouth.
- Eyes and nose. Satin stitch the pupils from the middle out, leaving the highlight bare, then fill the nose the same way.
- Feathering and fur. Add the long curved lines on the ears and chest, each one from the root toward the tip.
- Stop when it looks like your dog. Prop the hoop up across the room and squint. If it already reads as your golden, you're done, even with dots left. They rinse away.
Common golden mistakes
- The ears turn into a dark mat.
- Too many fur lines. Keep to a few long strokes per ear and let the linen show between them.
- Choppy, spiky feathering.
- Follow every dot along each curved line instead of skipping ahead. Long stitches look spiky, short even ones look soft.
- Puckered linen around the chest.
- The fur stitches were pulled tight. Let each stitch lie flat on the fabric.
Questions people ask
Can I turn a photo of my Golden Retriever into an embroidery pattern?
Yes. The Stitch Your Dog course turns a photo of your own golden into a pattern with every stitch marked by a dot, the same way it made Maple's pattern on this page. Use a clear photo with both eyes in focus and one dog in the frame.
What stitches work best for a Golden Retriever?
Two: back stitch for the outline, the ears and the fur lines, and satin stitch for the eyes and nose. Both are beginner stitches, and they're the two the course teaches.
How do I show a Golden Retriever's feathered ears and chest in thread?
Use a few long, curved lines that follow the way the feathering falls, stitched from the root toward the tip. Don't try to stitch every strand. Three to five strokes per ear is plenty.
How long does a Golden Retriever portrait take to stitch?
Maple's detailed pattern has 799 stitches in all: 681 backstitches and 118 small satin stitches. At an easy beginner pace of 2.5 to 4 stitches a minute, that's roughly 3.5 to 5.5 hours, spread over a few evenings. The Simple version is shorter.
Is there a free golden retriever embroidery pattern?
The pattern on this page is a sample to look at. The course makes a pattern from a photo of your own golden, which is the one that will actually look like your dog.
How do I embroider a fluffy dog?
Suggest the fluff instead of stitching it. Outline the shape, then add a few long fur lines where the coat is thickest, such as the ears and chest. Fewer lines look softer, and the bare linen does the rest.
Sources: Stitch Your Dog pattern maker: its photo checks and its real output on our sample dogs (1 Nov 2026) · Royal School of Needlework Stitch Bank: Back stitch · Royal School of Needlework Stitch Bank: Satin stitch · Needle 'n Thread: 10 tips for a sensational satin stitch