
How-to guide
How to use stick and stitch, step by step
Stick and stitch is a printable, sticky sheet that dissolves in water. Print your pattern on its soft side (not the shiny backing) at 100%, peel the backing, smooth it onto your fabric, hoop it drum-tight and stitch right through the sheet. When you finish, trim the extra and soak it in lukewarm water for 5 to 10 minutes.
What stick and stitch is (and what stabilizer means)
Stick and stitch is a kind of water-soluble stabilizer: a thin, fabric-like sheet that holds your design on the fabric while you stitch, then washes away. This kind has a sticky back and takes ink from a home inkjet printer, so your pattern goes onto it like a label.
Stabilizer, in general, is any backing or topping that supports fabric while you stitch. For hand embroidery on a firm fabric like linen, you don't need one to hold the fabric up. You use the water-soluble kind only to carry the pattern. The side-by-side comparison covers the plain, non-sticky kind.
It's also how our patterns are delivered: every pattern made from your dog's photo comes as a stick and stitch print file, with a dot marking every needle hole, a 1-inch check and a small practice piece.
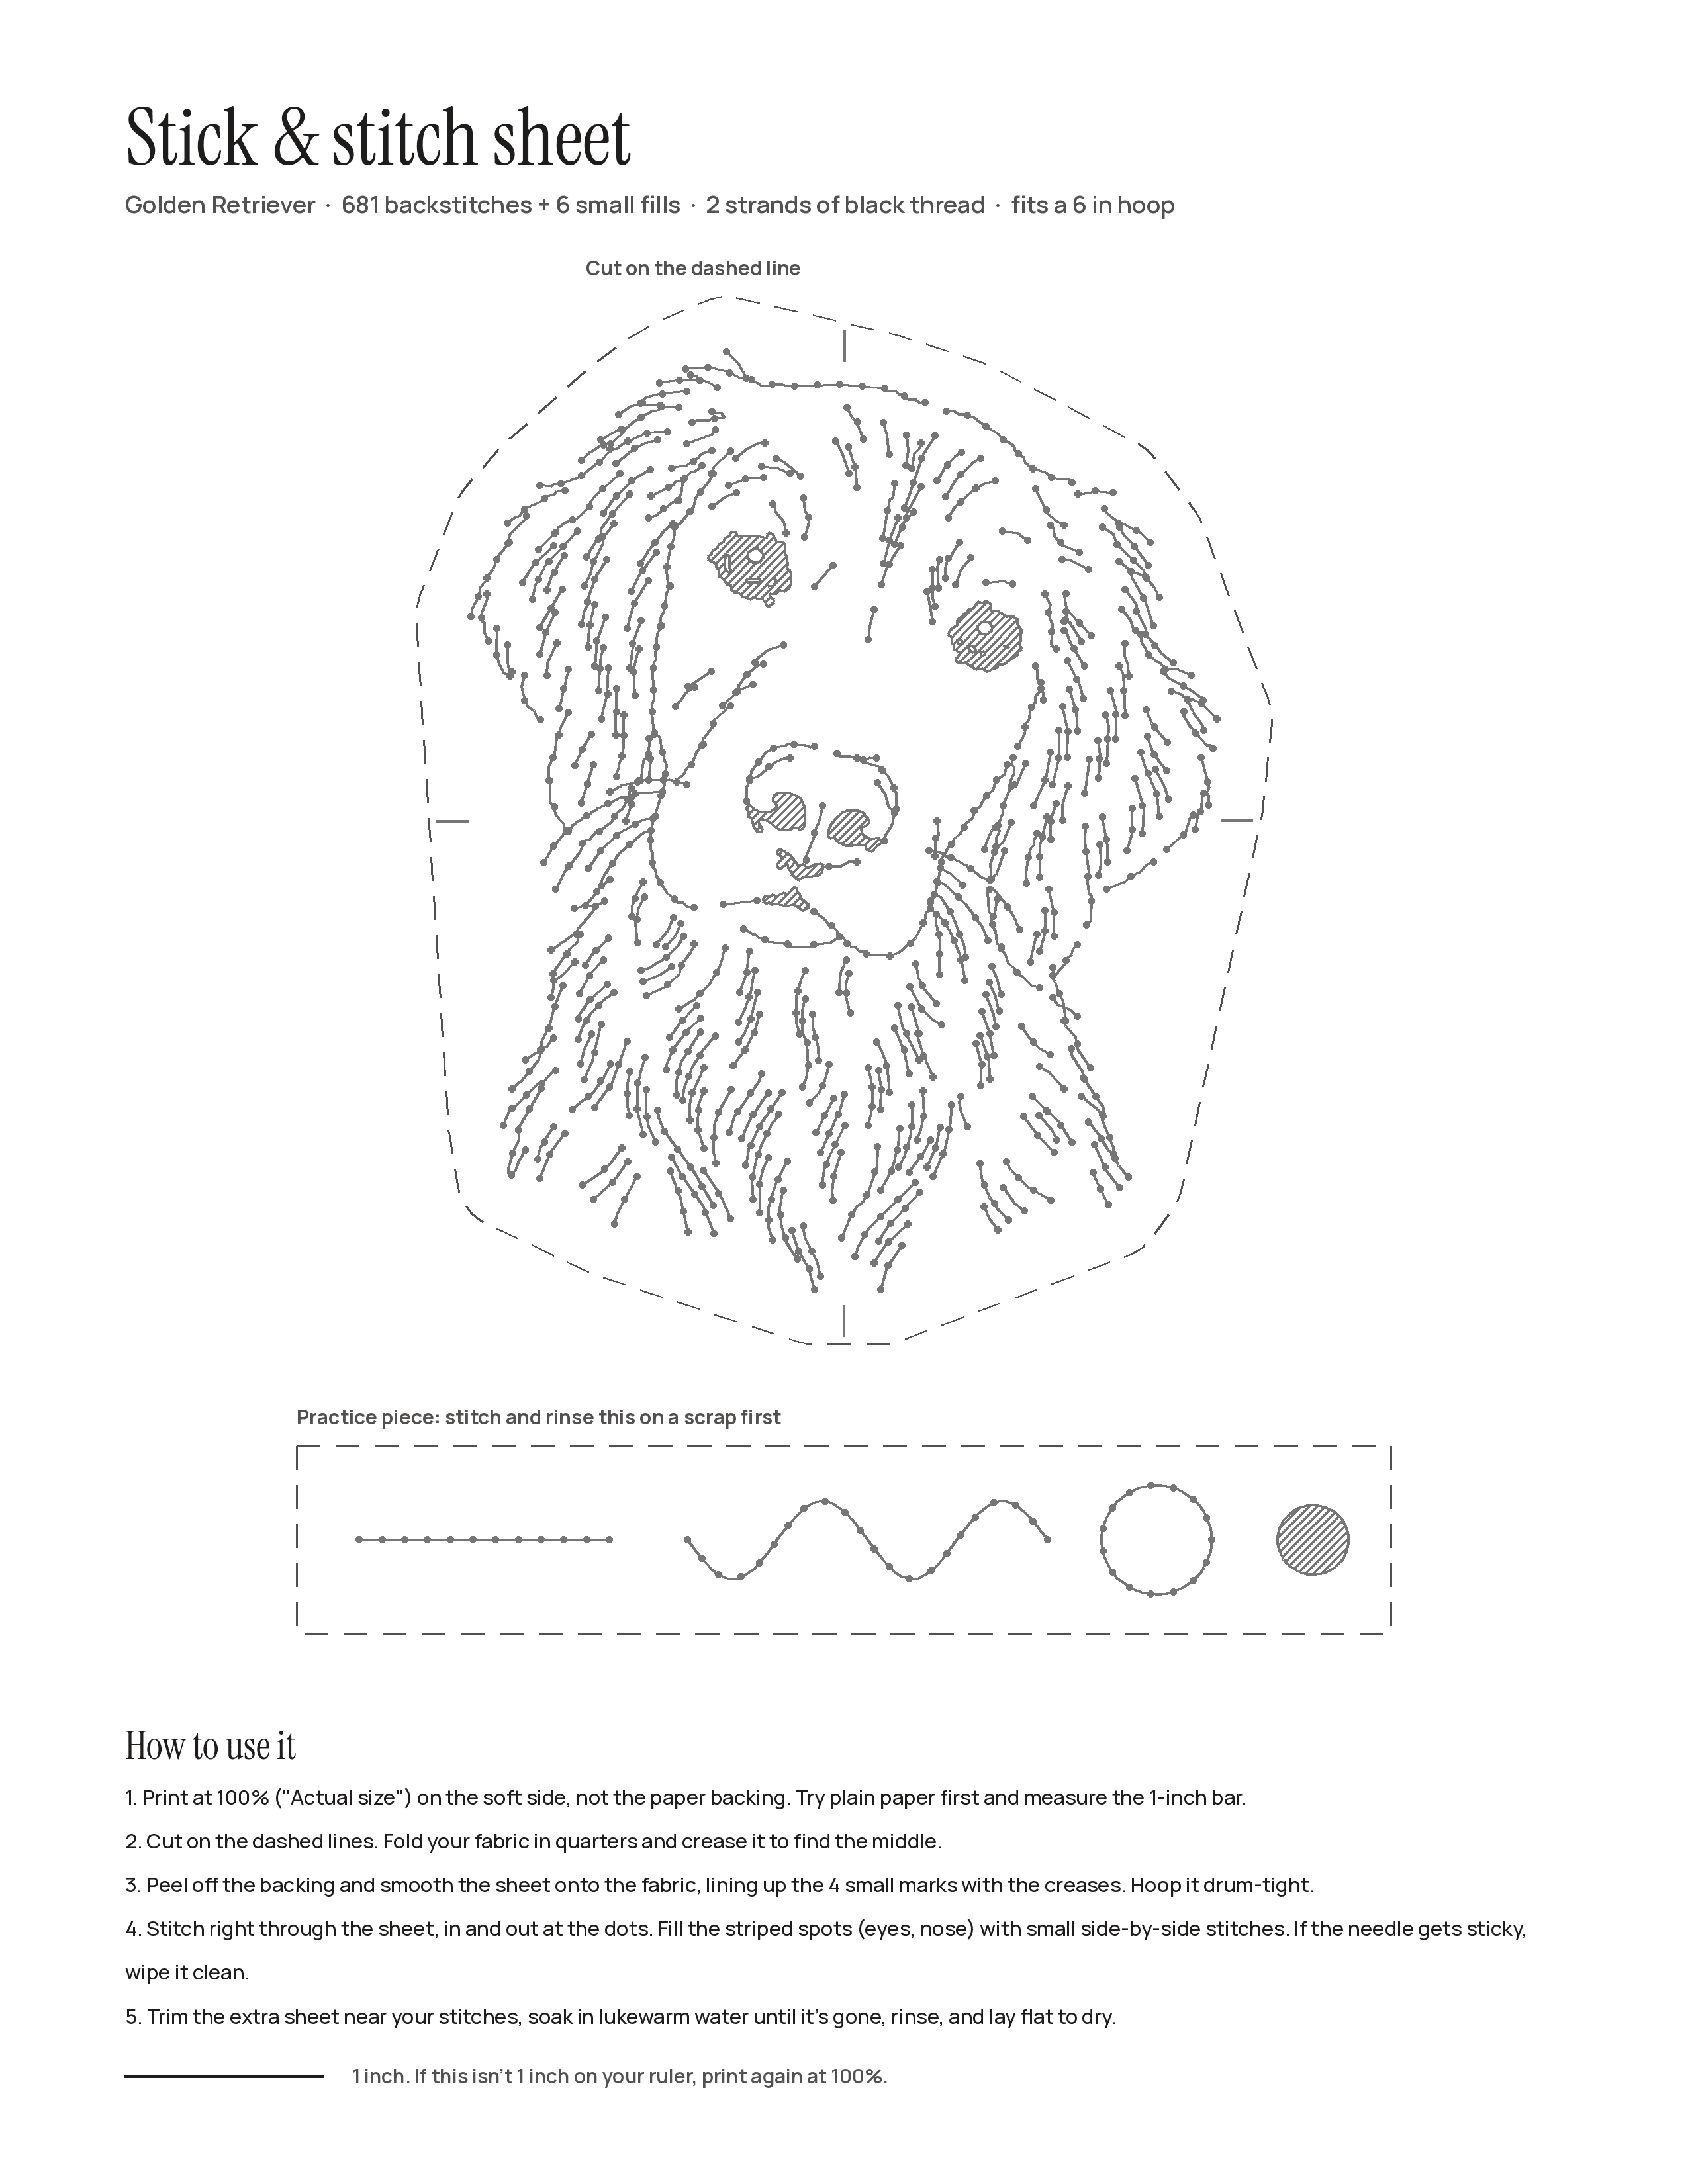
Step by step: a pet portrait from sheet to rinse
- Print a test on plain paper. Open the print file and set the size to 100% ("Actual size"), with "Fit to page" turned off. Run a copy on plain paper first and check the 1-inch bar with a ruler. If it isn't exactly 1 inch, fix the settings before you use a sheet.
- Print on the soft side, lightly. Load one sheet so the printer prints on the soft side, not the shiny backing. Pick the lightest or draft ink setting, because heavy ink can leave grey marks in the linen. Let it dry for 5 minutes before you touch it.
- Cut it out. Cut around the design, leaving a small margin. Cut the practice piece off too, and stitch it on a scrap first: a line, a wave, a circle and a dot.
- Find the center of the fabric. Fold your pre-washed linen in half both ways and pinch the folds. Where the creases cross is the center.
- Stick it on. Peel off the backing and press the sheet down with the middle of the dog over the center and the top of the head toward the top. Smooth it from the middle out, with dry hands.
- Hoop it drum-tight. Lay the linen over the inner ring, press the outer ring down, and ease the fabric tight all around without tugging the printed area. Tighten the screw a little at a time. Tap it: it should sound like a small drum.
- Stitch right through the sheet. Come up and go down exactly on the dots, straight up and straight down. Do the outline and face lines first in back stitch, then the eyes and nose in satin stitch, then the fur.
- Wipe the needle when it gets sticky. The sheet's glue slowly builds up on the needle. Wipe it with a little rubbing alcohol on a cloth and carry on. Don't wax the thread to fix it.
- Trim and soak. Cut away the extra sheet just outside your stitches, then soak the piece in lukewarm water for 5 to 10 minutes and finish under the running tap. The removal guide has every detail.
Good to know before you start
- Do you need a hoop? Yes. The sheet holds the design, not the fabric. A 6-inch hoop keeps the linen drum-tight so your stitches sit flat and land on the dots.
- Dark fabric? It works. You stitch on top of the printed lines, so you never need to see through the fabric the way you do when tracing.
- Keep it dry until rinse day. The sheet starts to dissolve the moment it's wet, so stitch with dry hands, and never put an iron on it.
- Genuine sheets matter. Buy real water-soluble stick and stitch sheets. Some look-alikes use a glue that doesn't wash out and leaves a stiff, sticky film.
- Unhoop when you stop for the day. It keeps a ring mark out of the linen.
Other ways to transfer a pattern
Stick and stitch isn't the only way to get a design onto fabric. Here's how the common methods compare for a first pet portrait, best first.
Transfer methods ranked for a beginner's first pet portrait
| Method | How it works | Good for | Watch out for |
|---|---|---|---|
| Stick and stitch sheet | Print, stick on, stitch through, rinse away | Detailed designs, any fabric color, beginners | Needs a rinse at the end, and the needle can get sticky |
| Water-soluble pen with a window or light box | Tape the pattern behind the fabric and trace the lines | Light, thin fabric and simple lines | Hard on dark or thick fabric, and tracing hundreds of dots is slow |
| Heat-erasable pen | Trace, then the lines vanish with an iron or hair dryer | Light fabric and quick projects | Lines can come back if the piece gets very cold, and heat near finished stitches is a risk |
| Carbon or dressmaker's transfer paper | Trace over the pattern onto the fabric underneath | Dark fabric, with white or yellow paper | Lines can smudge as you work, or be hard to remove |
| Iron-on transfer pen | Draw the design in reverse, then iron it onto the fabric | Repeating one design many times | Usually permanent, so your stitches must cover every line |
For a dog portrait we pick stick and stitch. A pattern made from a photo has hundreds of dots, one for each needle hole, and a printed sheet puts every one exactly where it belongs. Tracing that many by hand is where a likeness drifts.
Can you print an embroidery pattern straight onto fabric? You can, with fabric sheets made for inkjet printers, but that ink stays. Your stitches then have to hide every printed line, which is hard to do with a dot-to-dot pattern.
Questions people ask
How do you use stick and stitch embroidery?
Print your pattern on the soft side of the sheet (not the shiny backing) at 100%, cut it out, peel the backing and smooth it onto your fabric. Hoop it tight, stitch right through the sheet, then trim the extra and soak it away in lukewarm water.
Do you need a hoop with stick and stitch?
Yes. The sheet carries the design, but a hoop keeps the fabric drum-tight so your stitches lie flat and land on the dots. A 6-inch hoop fits a dog portrait.
Can you use stick and stitch on dark fabric?
Yes. Because you stitch on top of the printed sheet, the color of the fabric doesn't matter. That's one of its big advantages over tracing.
How long do you soak stick and stitch?
About 5 to 10 minutes in lukewarm water, swishing now and then, then a rinse under the running tap. If the fabric feels stiff once it's dry, rinse it again.
What is stabilizer in embroidery?
A backing or topping that supports fabric while you stitch. Stick and stitch is a water-soluble stabilizer with a sticky back: it carries your pattern, then washes away.
Sources: Wandering Threads: How to use stick & stitch transfer paper · Sulky: Water-soluble stabilizer · Sulky: Getting marks off fabric after soaking · Needle 'n Thread: How to set up an embroidery hoop